
Wednesday, May 15, 2013
Generating a Cut Fill Map
Generating a Cut/fill map in Civil 3d is quick and easy. I'm posting this by special request. Several people have been asking about proper workflow on how to create these exhibits. Select the link below to view my Chronicle Video. Happy Grading!!
 https://chronicle.autodesk.com/Main/Details/bb9076d8-253e-4be9-ae15-f4fc072fe089
Monday, July 9, 2012
Surface Housekeeping Made Easy
Surface housekeeping can be a bit time consuming if you don't know the tricks of the trade. I'm going to show you how to quickly cleanup and optimize your surfaces so that they are accurate and report accurate earthwork results. All of these setting options take place in the Surface Properties Dialog box. To access this click on your surface in your drawing space and then from your contextual ribbon select "Surface Properties".

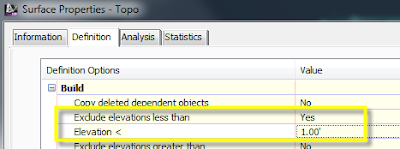
In the Surface properties dialog box select the "Definition" tab and then expand the "Build" category. We have 3 different settings we are going to look at. The first one is the "Exclude elevations less than" option. This option will control those points that have been added to the surface definition but don't contain a value (eliminating those "0" spikes from our surfaces). Doing this will resolve most black holes in the contours and result in more accurate earthwork calculations. Set the value for "Exclude elevations less than" to "YES" and then in the "Elevation" value just below enter "1".
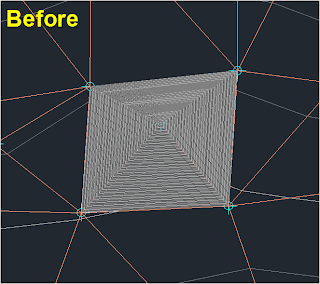
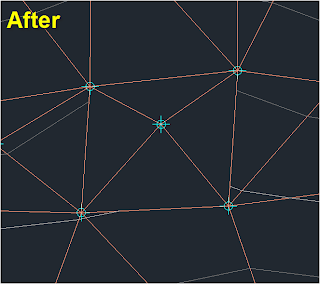
Next we will look at "Using a Maximum Triangle Length". This one will require you to look at your surface data to determine the best value for your project. Do a couple of quick measurements to check the approximate topo grid shot spacing in your data and then choose a maximum triangle length that exceeds the longest value. This may take some trial to get the correct value and although it will not remove all the extraneous triangles it will remove a majority. This is very handy in the event you don't have a surface boundary to add to the definition. In the Same dialog box set the "Use a maximum triangle length" to "YES" then below that input the maximum value you determined in the last step.


In the Surface properties dialog box select the "Definition" tab and then expand the "Build" category. We have 3 different settings we are going to look at. The first one is the "Exclude elevations less than" option. This option will control those points that have been added to the surface definition but don't contain a value (eliminating those "0" spikes from our surfaces). Doing this will resolve most black holes in the contours and result in more accurate earthwork calculations. Set the value for "Exclude elevations less than" to "YES" and then in the "Elevation" value just below enter "1".


And lastly lets take a look at the newest option added to the 2013 release. "Maximum angle between adjacent TIN lines" This option will in most cases resolve the remaining extraneous triangle lines in your surface. Again based on your data you may need to do a little trial on this to get the correct value. Set the "Use maximum angle" value to "YES" and then in the angle value just below enter your value (180 is the default).


Happy Surfacing!
Friday, April 6, 2012
Civil 3d 2013 is here!

I know its been awhile and I know I have been neglecting you all but trust me when I say, I'm vowing to post regularly on a going forward basis. So lets talk about the new Civil 3d 2013. It's new, It's here, and it's got a lot of really cool tools. Over the coarse of my next few posts I plan on showcasing many of these new enhancements and tools. Exciting things to mention are
- Pressure Pipes (Yeah, finally)
- Cloud Access
- Rail design
- New enhanced Corridor tool
- New Volumes Dashboard
- New Drive tool
- Survey Query tools
- Embedded Sub Assembly Composer
- ....and more.


Thursday, July 28, 2011
Civil 3d 2012 Catchment Objects
I'm sure by now you have all upgraded your Civil 3d to the new 2012 release (or at least I hope you have) and I'm sure you're all enjoying some of the new great features that have been added. In this blog entry we will be discussing and demonstrating how to use the new Catchment Object tools.
From the Analyze tab on your Ribbon select Catchments and then select Catchment Area,


From the Analyze tab on your Ribbon select Catchments and then select Catchment Area,

Specify the Catchment properties you would like prior to creating any catchment objects.
From the same Catchment drop down select Create Catchment Group and then provide a Name.
From the Catchment drop down one more time, select "Create catchment from surface".
Select a discharge point on your surface and the catchment creation dialog box will appear.
Provide a Name, Surface and Drainage Structure (optional), and Runoff Coefficient and then select OK

After click OK you will return to your drawing and the Catchment area boundary and flow path will have been created along with the labels for both. If you haven't done so yet, take the time to setup some catchment object and label styles so that it presents properly.

After completing the creation of your Catchment area, select it and then select "Catchment Properties".
On the Catchment Area Properties tab you will be able to obtain all the relevant information regarding your catchment area.

All Catchment Objects created will now be accessible from your Toolspace under the new "Catchments" category. I hope this sheds some light on this new tool. Have fun using it. Thanks.
Friday, April 22, 2011
Civl 3D 2012 - Help is on the way!
Continuing with my updates on New Features in Civil 3d 2012 I wanted to introduce you all to a new resource that has been added to the software.
The new "Help" tab.

This is a great addition to the software for everyone from the "new user" down to the "old pro". It's your one stop shop for all things civil. In here you will find things like "What's New" video's, "Learning path" where you can pick up new tricks. "Developer Resources" where you can learn how to customize your software. "User Groups which will take you to AUGI (Autodesk User Group International). And my favorite, "Task Workflows" where you can not only learn how to use the tools but you will learn Best Practises, Drawing Structure, in what order to do things. Not to mention direct access to "Disscusion groups", "Customer Involvement" and "Product feedback".
I know it will be hard to abandon that long list of favorites in you Internet explorer that you dig through everytime you need an answer but I think you'll manage.
The new "Help" tab.

I know it will be hard to abandon that long list of favorites in you Internet explorer that you dig through everytime you need an answer but I think you'll manage.
Tuesday, April 12, 2011
Civil 3d 2012 in Style
Anyone who has used Civil 3d for any length of time knows that it is heavily Style driven. You should also know that it is vital to have a template containing all of your Styles to make your workflow easier. However, sometimes we still have a need to share styles, either with each other or from drawing to drawing. Prior to the 2012 release of Civil 3D, this was not an easy process.
Traditionally, we could drag-n-drop one style at a time or we could insert one drawing into another to gain access to its styles. Or if you are a hardcore user you may have known that in Civil 3D 2011 there was a system variable you could type called
AECCIMPORTSTYLES
and its brother
AECCIMPORTSTYLESANDSETTINGS,
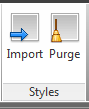
but these were not very user friendly. They were command line driven and you would have to know the exact name and path of the file you were trying to steal from. Civil 3d 2012 has resolved this issue. On the MANAGE tab of your ribbon we now have a couple of new buttons: "Import Styles" and "Purge Styles" (yes, I said Purge styles).

 Civil 3d 2012 will be released into the wild shortly so everyone hold on tight, we have a lot of other new tools and enhancements we will be showcasing for you so check back soon.
Traditionally, we could drag-n-drop one style at a time or we could insert one drawing into another to gain access to its styles. Or if you are a hardcore user you may have known that in Civil 3D 2011 there was a system variable you could type called
AECCIMPORTSTYLES
and its brother
AECCIMPORTSTYLESANDSETTINGS,
but these were not very user friendly. They were command line driven and you would have to know the exact name and path of the file you were trying to steal from. Civil 3d 2012 has resolved this issue. On the MANAGE tab of your ribbon we now have a couple of new buttons: "Import Styles" and "Purge Styles" (yes, I said Purge styles).
This new dialog driven feature is very user friendly and make sharing Styles quick and easy. You can select one or several Styles, entire categories of Styles, or the entire drawing and quickly drop them right into you current file. It will even allow you (or prompt you) with an option to overwrite existing Styles if you happen to have Styles with duplicate names.

With the Purge Styles option you can quickly view a list of unused Styles within you current drawing and then select the items to purge and then easily remove them from your files. yes, working with Styles just got a lot easier.

Thursday, March 10, 2011
Are you ready for 2012

Also if you've never been to or its been a while since you've gone through formal training you definitely should include that in your planning. As I tell everyone, Civil 3d is a great program and anyone can click buttons and make stuff appear on the screen but you won't have well built, stable files nor will you be able to take full advantage of the software without someone showing you the proper workflow. Civil 3d is NOT a program you can or should teach yourself on your lunch hour, well maybe you could but it will take a long time to ramp up to where you need to be and you won't learn the best practice workflows of the software. I'm not trying to preach or sell you anything. I just know from experience Civil 3d can be a beast but with proper guidance it will be the greatest civil design program you will ever use.
Stay tuned. As soon as Autodesk releases the discussion ban from me I will be showcasing new feature tips and demos here so check back soon, check back often.
Enjoy my latest tip provided below.
Subscribe to:
Comments (Atom)